WebRTC Video
Provides low-latency video streaming over an end-to-end encrypted WebRTC connection. Once installed you can use the provided embedding instructions to embed the video widget for that robot in your own web application.
Features
- Ultra low latency:
- typical peer-to-peer latency:
- local network connections: 1 frame, e.g., 33 ms at 30 fps
- relay (TURN) connections: 2 frames, e.g., 66 ms at 30 fps
- typical glass-to-glass, including USB camera latency: 130 ms
- typical peer-to-peer latency:
- Allows setting desired bit rate (in KB/s), e.g., for choosing between high definition and lower bandwidth cost
- Multi-camera support
- Up to 10 cameras
- Can be easily arranged into layouts using CSS
- Configurable relative priorities for bandwidth allocation per camera
- Supports various video sources:
- Video4Linux cameras, i.e., most USB cameras
- allows you to select from list of resolutions and frame rates supported by your cameras
- ROS and ROS2 image topics, incl. bayer encoded ones, and pre-encoded h264 streams
- RTSP streams, e.g., from IP cameras
- custom GStreamer source pipelines
- including
zedsrcfor ZED cameras (requires addinglibgomp.so.1told.so.preload)
- including
- Video4Linux cameras, i.e., most USB cameras
- Efficient and responsive video encoding
- Uses h264 for efficient compression
- Hardware acceleration on Nvidia platforms (e.g., Jetsons), Rockchip based platforms (e.g., Orange Pi, Firefly), and Intel VA-API compatible chipsets (e.g., HD Graphics)
- Minimizes bandwidth use when video scene is static
- Congestion control: automatically adjust bit rate to account for network conditions
- Robust against even heavy packet loss
- Automatically reconnects after network loss
- Encrypted end-to-end
- To learn more about the security model of WebRTC and why it is safe see, e.g., here.
- No bandwidth cost when sender and receiver are on the same network
- Audio streaming (beta)
- Supervisor UI:
- A UI component listing all ongoing sessions on a robot
- Allows joining an ongoing session without increasing bandwidth or CPU usage on the robot
Local Mode
When running in a self-hosted deployment offline, i.e., not connected to the Internet, the two WebRTC peers, robot + web user, can now discover each other via a new, locally hosted STUN server included in the cloud capability. This is used automatically when the robot is unable to reach the default TURN server hosted by us. This means you can now use Remote Teleop in local networks that are not connected to the Internet. Note, however, that your server still needs to go online every few days to receive an updated billing token for your robots' capabilities.
Dependencies
Requires gstreamer 1.16 (Ubuntu 20.04) or later.
During the installation process the Transitive agent will try to install all required dependencies into its sandbox environment. If this fails or if your build and deployment process makes it preferable you can pre-install them manually:
sudo apt install build-essential pkg-config fontconfig git gobject-introspection gstreamer1.0-x gstreamer1.0-libav gstreamer1.0-nice gstreamer1.0-plugins-bad gstreamer1.0-plugins-base-apps gstreamer1.0-plugins-good gstreamer1.0-plugins-ugly gstreamer1.0-tools libgstreamer1.0-0 libgstreamer1.0-dev libgstreamer-plugins-base1.0-dev libgstreamer-plugins-bad1.0-dev libgirepository1.0-dev libc-dev libcairo2 libcairo2-dev
Docker
If you are running Transitive inside a Docker container and want to use USB cameras, then be sure to add the following to your docker run command (or similarly for docker-compose):
-v /run/udev:/run/udev # required by gst-device-monitor-1.0 to enumerate available devices and supported resolutions
Configuration
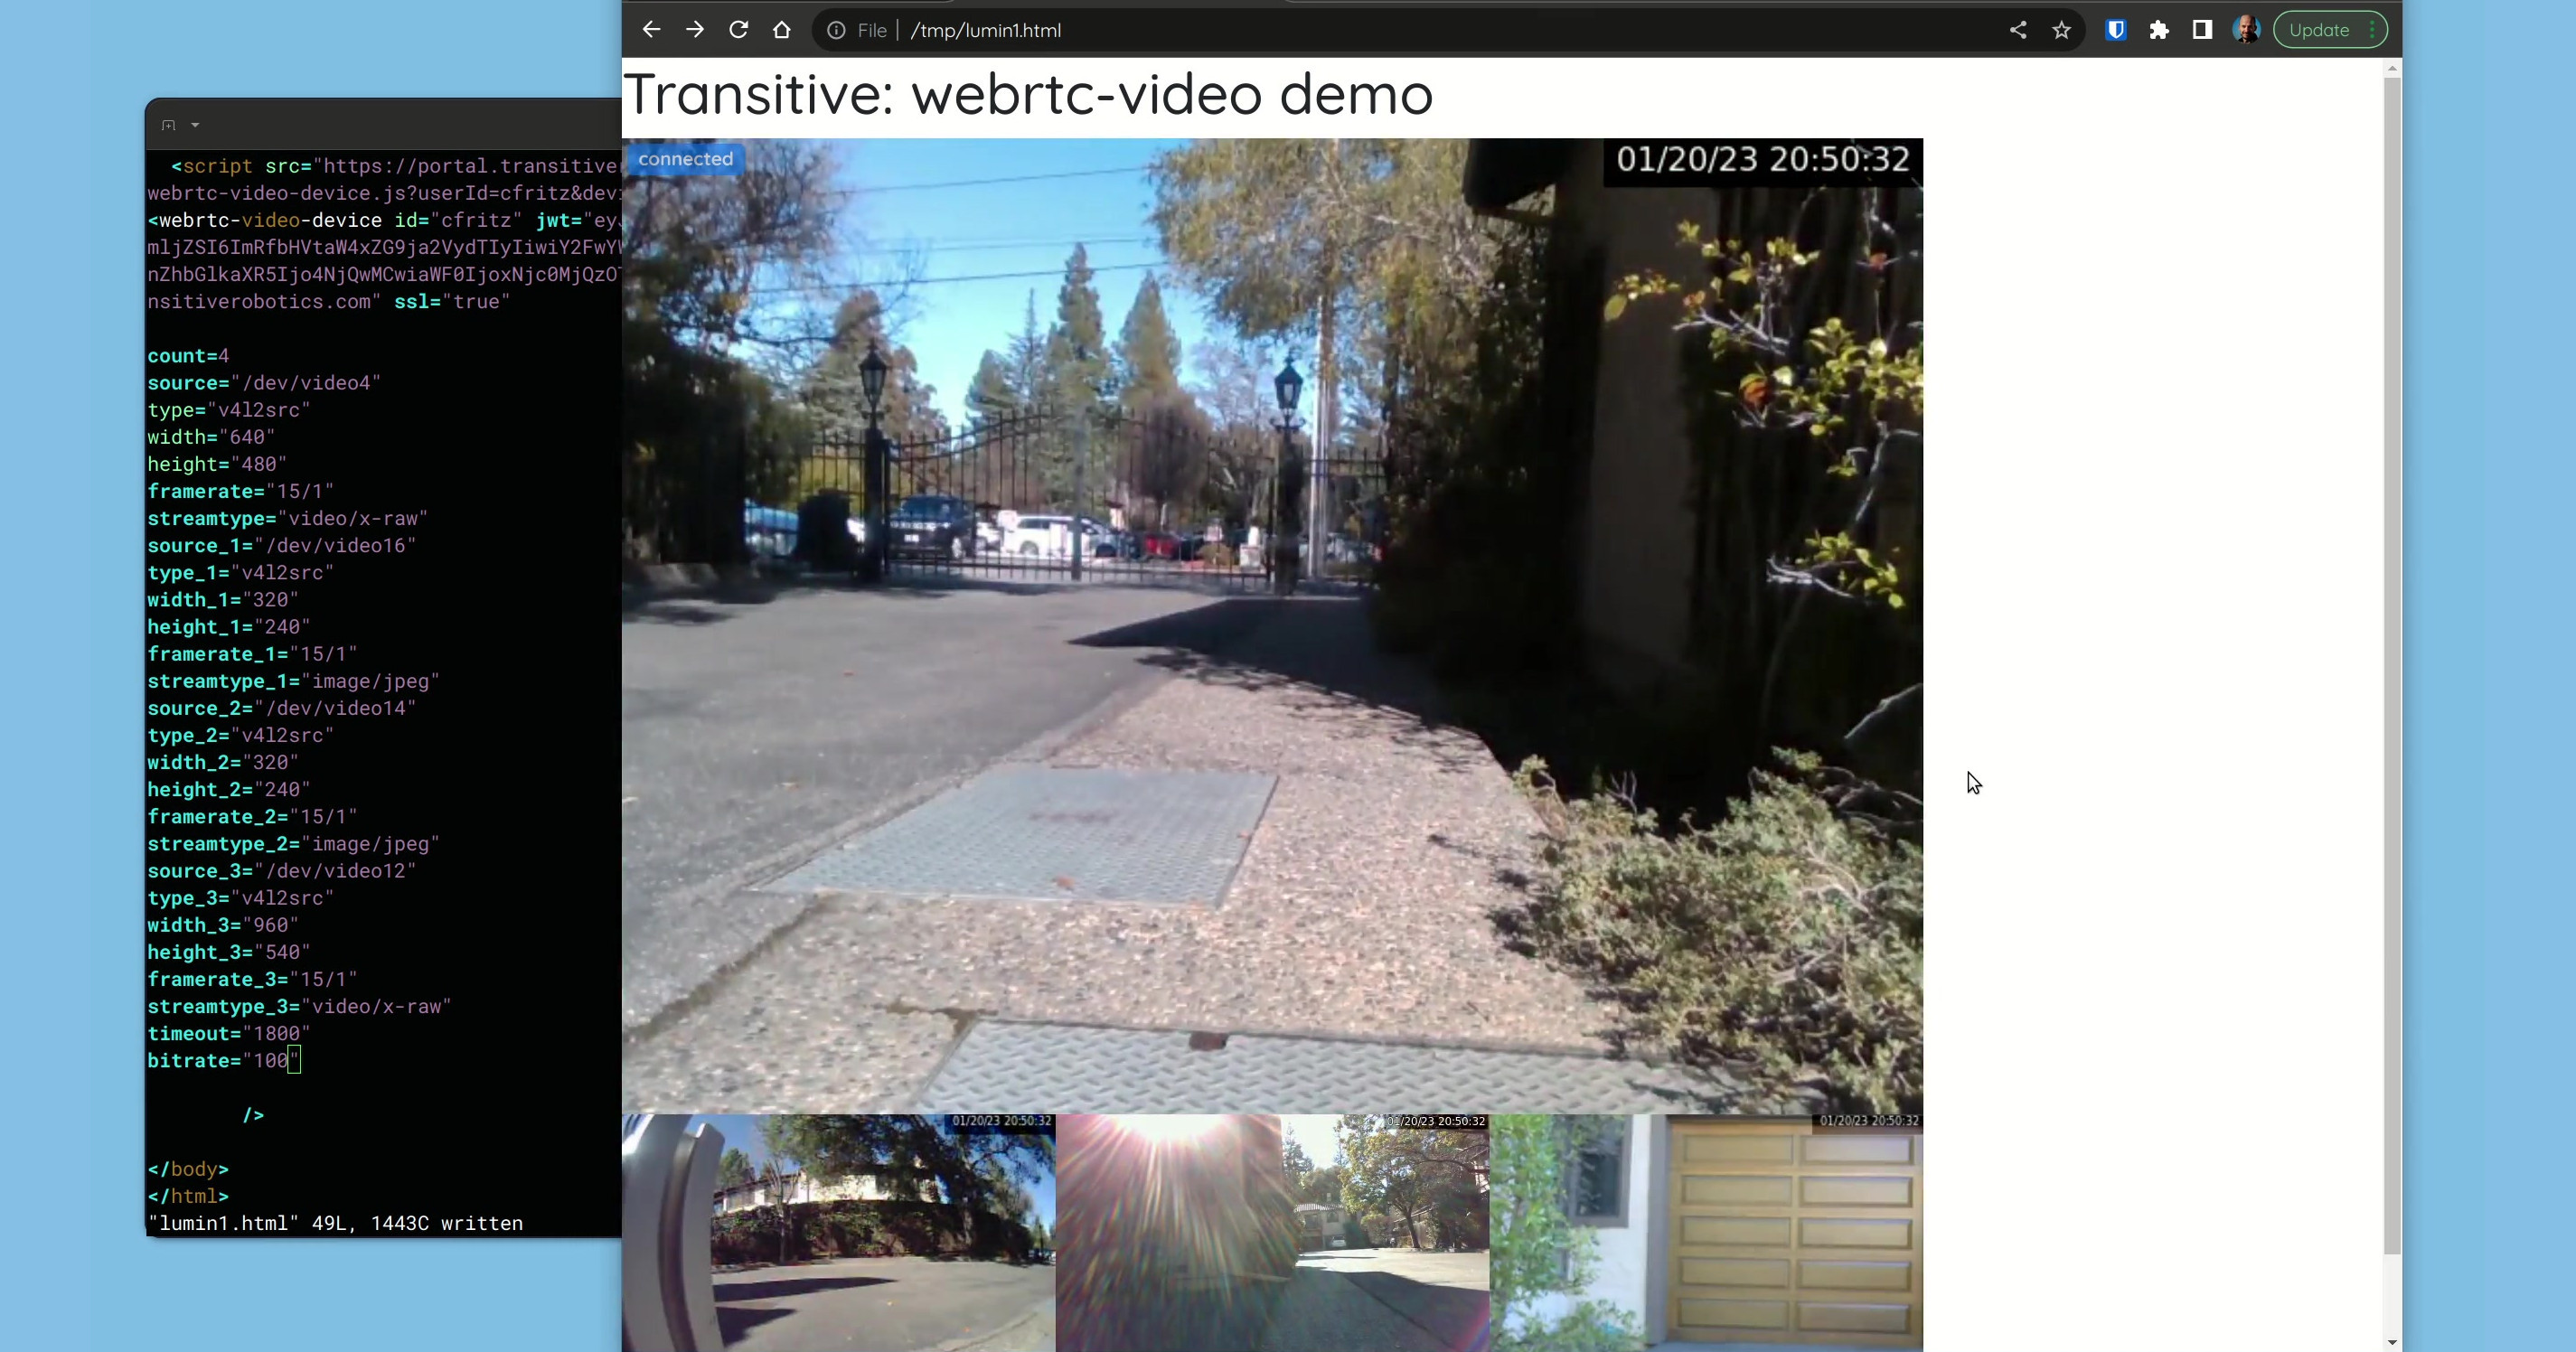
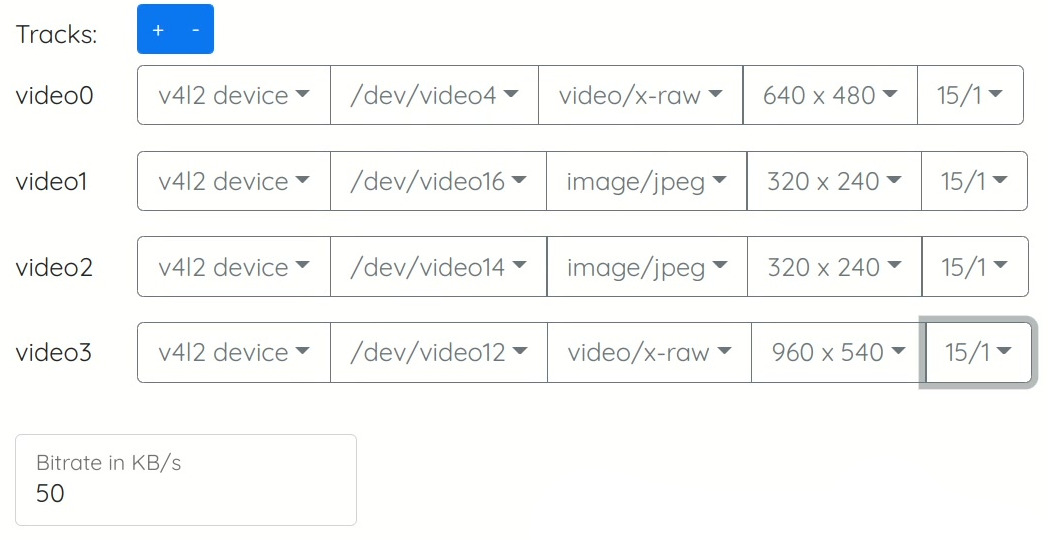
The easiest way to configure the capability is to use the UI in the Transitive portal, which gives you the option to choose the video source to use as input, plus any parameters you may be able to set on it, e.g., resolution and frame rate on v4l devices, plus bit rate. Once configured, the video will show as well as the attributes you need to add to the embedding HTML snippet to use the configuration you selected.
Alternatively you can configure a default source (or multi-source layout) and parameters in your ~/.transitive/config.json file, e.g.:
{
  "global": {
    ...
  },
  "@transitive-robotics/webrtc-video": {
    "default": {
      "streams": [
        {
          "videoSource": {
            "type": "rostopic",
            "rosVersion": "1",
            "value": "/tracking/fisheye1/image_raw"
          },
          "complete": true
        },
        {
          "videoSource": {
            "type": "v4l2src",
            "value": "/dev/video0",
            "streamType": "image/jpeg",
            "resolution": {
              "width": "432",
              "height": "240"
            },
            "framerate": "15/1"
          },
          "complete": true
        },
        {
          "videoSource": {
            "type": "videotestsrc"
          },
          "complete": true
        }
      ]
    }
  }
}
and then add use-default=true as an attribute in the embedding HTML to use this instead.
Hardware Accelerated h264 Encoding
This capability will automatically use any available and supported hardware encoders on your device. Currently supported are NVIDIA boards like Jetsons and Orins, NVIDIA Deepstream 6.3+, Rockchip based platforms like the Orange Pi and Firefly, and Intel graphics chipsets that support VA-API.
Note: Bandwidth optimization is not yet implemented for Rockchip hardware encoders. Please let us know if you are using a Rockchip based platform. This will help us prioritize adding support for this if you need it.
NVIDIA
On Jetson platforms there is nothing you need to do to enable hardware acceleration. These platforms come with the necessary drivers and libraries pre-installed.
Intel VA-API
If your compute platform supports hardware encoding via the VA-API, WebRTC Video will automatically utilize it if the following requirements are met:
- The
aptpackagesgstreamer1.0-vaapi,libdrm-dev,libva-dev, andi965-va-driver(or equivalent driver for your hardware) are installed. - These environment variables are set:
One way to set these environment variables is by adding them toGST_VAAPI_ALL_DRIVERS=1
LIBVA_DRIVER_NAME=iHD # or replace with the name of your driver, e.g., i965
LIBVA_DRIVERS_PATH=/usr/lib/x86_64-linux-gnu/dri~/.transitive/.env_user(create the file if it doesn't exist).
Using VA-API in Docker
- Install
gstreamer1.0-vaapiinside the container. - Install
libdrm-dev,libva-dev, andi965-va-driver(or equivalent driver for your hardware) both inside and outside the container - Add these arguments to your
docker runcommand (or corresponding fields indocker-compose.yaml):--device=/dev/dri/
-e GST_VAAPI_ALL_DRIVERS=1
-e LIBVA_DRIVER_NAME=i965 # or replace with the name of your driver, e.g., iHD
-e LIBVA_DRIVERS_PATH=/usr/lib/x86_64-linux-gnu/dri
Deciding on a bitrate
In order to find an appropriate bitrate for your streams, we suggest 0.02 bytes per pixel as a rule of thumb. For example, one stream of 640x480 at 15 fps results in 4,608,000 pixels per second, multiplied by 0.02 bytes/pixel gives 92 KB/s as a suggested bitrate. You can set it lower if necessary, but the quality will really suffer. Of course, if your connection allows it, you can always set it higher to increase image quality.
As of v0.22.2 this capability has an auto-bitrate mode which applies the above rule of thumb automatically when no bitrate is specified.
Framerate
When using a v4l source, i.e., a usb cam, you can choose any of the framerates provided by the hardware. When using ROS topics, the default framerate is 15/1, i.e., 15 frames per second. This can be changed by providing the framerate option in the embedding code, e.g., framerate="10/1".
RTSP streams (IP cameras)
To use an RTSP stream as video source, such as those provided by many IP cameras, set the type in your embedding HTML to rstp, and set the source to the RTSP URL provided by your camera. For instance:
  <webrtc-video-device id="superbot" host="transitiverobotics.com" ssl="true"
    jwt={jwt}
    count="1"
    timeout="1800"
    type="rtsp"
    source="rtsp://my-ip-camera:8554/cam"
    />
This assumes that your stream is already h264 encoded, as is common with IP cameras, and that you do not wish to transcode the stream. This is by far the most CPU efficient option but also implies that the webrtc-video capability will not be able to provide congestion control or set the bitrate. If you do want to decode the stream and re-encode it in order to get congestion control and bitrate control back, you can use type="rtsp-transcode" instead.
ROS topics carrying pre-encoded h264 streams
While we do not recommend this, some users may choose to multiplex their h264 video streams via ROS topics. ROS does not have a standard message format for video streams, but it is possible to "abuse" any ROS message type with a binary array data type, e.g., sensor_msgs/CompressedImage.
Assuming you have such a stream in a topic called /camera/h264, you can use that as your video input source in embedded code like this:
<webrtc-video-device id="superbot" host="transitiverobotics.com" ssl="true"
  jwt={jwt}
  timeout="1800"
  count="1"
  rosversion="1"
  type="rostopic-h264"
  source="/camera/h264"
/>
or in React:
<TransitiveCapability jwt={jwt} timeout="1800" count="1"
  rosversion="1" type="rostopic-h264" source="/camera/h264" />
where jwt, as always, is a JSON Web Token carrying the payload described in the Embed instructions of this capability on the portal. For ROS 2 just change the rosversion.
Note that whenever you use a pre-encoded h264 streams as input, you lose a very significant and important feature: congestion control. Hence, if your input stream uses a higher bitrate than your network can support, there will be no way for webrtc-video to adjust the bitrate to ensure low-latency. We therefor recommend against using pre-encoded h264 streams. When you do use them, please make sure they use a bitrate that is appropriate for your Internet connection.
Custom Video Source Pipelines
In addition to various video sources, the capability supports the specification of custom GStreamer source pipelines. In your embedding HTML you can specify type custom and set as source your custom pipeline. For example:
  <webrtc-video-device id="superbot" host="transitiverobotics.com" ssl="true"
    jwt={jwt}
    count="1"
    timeout="1800"
    type="custom"
    source="videotestsrc is-live=true ! video/x-raw,framerate=(fraction)15/1,width=640,height=480"
    />
This assumes that the sink of your pipeline can be fed into a videoconvert element for conversion to video/x-raw. If your pipeline produces a stream that is already h264 encoded and you don't want to decode and re-encode this stream, then you can set the type to custom-h264. Note that in that case the capability will not implement any congestion control for you.
This is an advanced feature and only meant for users who are familiar with GStreamer pipelines. It is also more difficult to debug. We recommend to test your custom source pipeline first using gst-launch-1.0 and autovideosink or fakesink.
Custom Video Sink Pipelines
In many cases, streaming video is only one of several usages of a robot's video sources. When this is the case it is useful to be able to "tee" the stream at several locations in the pipeline to feed it into auxiliary processing pipelines. Local recording is an example of this, but a very specific one. To support any other such applications, webrtc-video gives the ability to specify additional sink pipelines that can be injected after the encoding step of the pipeline. This is done per-stream.
Example
  <webrtc-video-device id="superbot" host="transitiverobotics.com" ssl="true"
    jwt={jwt}
    bitrate=50
    count="2"
    timeout=1800
    type="v4l2src"
    source="/dev/video0"
    streamtype="image/jpeg"
    framerate="15/1"
    width="640"
    height="480"
    encodedpipe="splitmuxsink location=/tmp/video0.mp4 max-size-time=60000000000 max-files=10"
    type_1="v4l2src"
    source_1="/dev/video2"
    streamtype_1="image/jpeg"
    framerate_1="15/1"
    width_1="640"
    height_1="480"
    encodedpipe_1="splitmuxsink location=/tmp/video1.mp4 max-size-time=60000000000 max-files=10"
    />
Local Recording
The capability supports recording all outgoing video on disk in a rolling buffer. This feature, similar to black-box recorders on airplanes, can be useful when investigating recent incidences after the fact. The buffer restarts each time a new session is started and currently records a maximum of ten minutes or 1 GB, whichever comes first. Add record="true" to your HTML embedding code to enable this. The recordings will be in /tmp/stream_*.mp4.
Device Sharing
The camera streams on robots are often used for multiple purposes, remote streaming only being one of them. When this is the case, the stream needs to be shared. This is trivial for ROS topics and RTSP streams, but not for USB cameras (video4linux2 devices). This is because under Linux only one process can open such a device at a time. Fortunately there are a few options for sharing the streams from these devices.
Virtual devices (v4l2loopback)
The v4l2loopback kernel module allows you to create virtual v4l2 devices which can be shared. Using ffmpeg or gstreamer you can then forward a physical device's stream to one or more such virtual devices.
Example:
# create the virtual devices
sudo modprobe v4l2loopback devices=2 video_nr=10,11 exclusive_caps=1,1 card_label="front_camera,back_camera"
# forward a physical device's stream to virtual device
ffmpeg -f v4l2 -input_format h264 -video_size 640x480 -framerate 30 -i /dev/video3 -c:v copy -f v4l2 /dev/video10
In this example we are forwarding a h264 stream provided by the camera (requires ffmpeg v6+), but the same approach also works for raw and jpeg streams.
RTP over UDP
In this approach we feed the stream coming from the camera to multiple UDP sockets using the RTP protocol. These UDP sockets can then be accessed using gstreamer's udpsrc element.
# producer
gst-launch-1.0 -e v4l2src device=/dev/video2 ! video/x-h264,width=640,height=480,framerate=30/1 ! h264parse config-interval=-1 ! rtph264pay ! multiudpsink clients=127.0.0.1:9001,127.0.0.1:9002
# Client 1
gst-launch-1.0 udpsrc port=9001 caps="application/x-rtp, media=(string)video, clock-rate=(int)90000, encoding-name=(string)H264, payload=(int)96" ! rtph264depay ! decodebin ! autovideosink
# Client 2
gst-launch-1.0 udpsrc port=9002 caps="application/x-rtp, media=(string)video, clock-rate=(int)90000, encoding-name=(string)H264, payload=(int)96" ! rtph264depay ! decodebin ! autovideosink
Shared Memory
Similar to the UDP approach, we can use shared memory to share the stream:
# Producer
gst-launch-1.0 -e v4l2src device=/dev/video4 ! video/x-raw,width=640,height=480,framerate=30/1 ! shmsink socket-path=/tmp/foo2 shm-size=2000000 wait-for-connection=false sync=true
# Clients
gst-launch-1.0 shmsrc socket-path=/tmp/foo2 do-timestamp=true is-live=true ! video/x-raw,width=640,height=480,framerate=30/1,format=YUY2 ! autovideosink
Or, for a h264 camera stream:
# producer
gst-launch-1.0 -e v4l2src device=/dev/video2 ! h264parse config-interval=-1 ! shmsink socket-path=/tmp/foo shm-size=2000000 wait-for-connection=false sync=true
# consumer
gst-launch-1.0 shmsrc socket-path=/tmp/foo do-timestamp=true is-live=true ! 'video/x-h264,profile=baseline,framerate=30/1' ! h264parse config-interval=-1 ! decodebin ! autovideosink
Audio support
When running in Docker, you may need to add these parameters to your docker run command (or similarly in docker-compose.yaml) in order for audio to work:
-e PULSE_SERVER=unix:/run/user/1000/pulse/native \
-v /run/user/1000/pulse:/run/user/1000/pulse \
-v ~/.config/pulse/cookie:/root/.config/pulse/cookie \
--group-add $(getent group audio | cut -d: -f3)
It also requires gstreamer1.0-pulseaudio to be installed on robot on older versions of Ubuntu.
Front-end
Styling
Each <video> element generated by the front-end web component will have a unique class name webrtc-videoN, where N enumerates the elements starting at 0. This makes it easy to arrange and style these elements using CSS. For instance, these CSS rules would create a layout where one camera, e.g., the front camera, is large on top, and at the bottom we have left, back, and right-viewing cameras.
webrtc-video-device video { position: absolute }
webrtc-video-device .webrtc-video0 { width: 960px; height: 720px; }
webrtc-video-device .webrtc-video1 { top: 720px; }
webrtc-video-device .webrtc-video2 { top: 720px; left: 640px; }
webrtc-video-device .webrtc-video3 { top: 720px; left: 320px; width: 320px; }
In addition, the div element immediately wrapping these video elements has the class name webrtc-video-wrapper. This makes it possible to use apply various CSS layout features such as flexbox or grid layouts, e.g., the following would create a layout where the front facing camera is large in the middle, left and right cameras are to the sides on top, and the backward facing camera is in the bottom left. The bottom right is left black here but would make for a good place to show a map component.
.webrtc-video-wrapper {
  display: grid;
  grid-gap: 10px;
  grid-template-columns: 1fr 1fr 1fr 1fr;
  grid-template-rows: 1fr 1fr;
  grid-template-areas:
  "left front front right"
  "back front front .";
}
.webrtc-video0 { grid-area: front; }
.webrtc-video1 { grid-area: left; }
.webrtc-video2 { grid-area: right; }
.webrtc-video3 { grid-area: back; }
video {
  width: 100%;
  height: 100%;
  object-fit: cover;
}
React callbacks
In React, this capability can be embedded using the TransitiveCapability tag from the @transitive-sdk/utils-web package. When doing so, you can provide an additional object as props containing callbacks you would like to receive, e.g.:
<TransitiveCapability jwt={jwt} timeout="1800"
  handlers={{
    // receive connection state events:
    onConnectionStateChange: (state) => console.log({state}),
    // continuously receive lag information:
    onLag: (lag) => console.log({lag}),
    // continuously receive stats from the webrtc connection:
    onStats: (stats) => console.log({stats}),
    // receive tracks as they are created
    onTrack: (track, mid) => console.log({track, mid}),
    // be notified when the user clicks on the video
    onClick: (clickEvent) => console.log({clickEvent}),
  }} />
Supervisor UI
The supervisor UI component allows you to join an ongoing session. It does so by forwarding the streams being watched from the watchers computer directly, i.e., it does not increase resource or bandwidth usage on the robot itself.
Like all UI components, the Supervisor UI can be embedded on other pages as well. When doing so, you can set the following options to automatically join the latest ongoing session on the device, and, optionally, to select only a subset of all stream (when the session has more than one stream/camera):
auto: set this if you want to auto-join the latest sessionstreams: a comma separated list of stream indices, e.g., "0,2"
This allows you, for instance, to create a page where you are showing one stream for each ongoing session. That page will auto-update as sessions start and stop, giving you a bird-eye overview of what is happening with your fleet.
Changelog
v1.3
- For ROS2, uses newer version of rclnodejs with pre-built binaries on Humble+
-
v1.3.3
- Fixes a bug in lag-detection when receiving audio
-
v1.3.4
- Improves peer-to-peer connection negotiation on unreliable networks
- Dark mode for session history
v1.3.5
- Fixes an issue on older versions of NVIDIA Jetpack when using compressed ROS topics
v1.2
-
Adds support for pipewire video devices (default in Ubuntu 24.04+).
-
Adds partial support for UVC H264 devices (Ubuntu 24+).
-
Now shows display names for video devices in UI.
-
v1.2.2
- Fixes a bug in the packet loss mitigation logic of Ubuntu 22+.
-
v1.2.3
- Fixes a bug that prevented using more than six streams.
- Fixes a bug in the auto-bitrate logic that resulted in a rate that was too low when using multiple streams.
v1.1
- Uses hardware acceleration on Nvidia platforms for decoding JPEG compressed image ROS topics
-
v1.1.4
- Allow setting framerate for ROS topic sources e.g.,
framerate="30/1". - Show per-track FPS in status badge tooltip.
- Allow setting framerate for ROS topic sources e.g.,
-
v1.1.5
- Adds new per-stream option
prioritythat allows you to set the relative priority of that stream for allocating available bandwidth (default = 1).
- Adds new per-stream option
v1.0
- No changes.
-
v1.0.2
- Adds support for ROS 2 Jazzy.
-
v1.0.3
- Adds new parameters
blacklist_netmaskandwhitelist_netmaskthat let you black list (resp. white list) robot-side netmasks to use for establishing the WebRTC peer-to-peer connection. This can be useful, e.g., to prevent the use of VPN interfaces (e.g.,blacklist_netmask: '10.0.0.0/8,172.0.0.0/8').
- Adds new parameters
v0.25
- Adds new "local mode".
- Fixes a bug in dynamic bitrate control when using audio.
v0.24
- Added support for JPEG compressed ROS image topics (
sensor_msgs/CompressedImage).
v0.23
- Added hardware acceleration for Intel devices supporting VA-API.
-
v0.23.1:
- Fixes an issue on some platforms with VA-API hardware acceleration.
-
v0.23.2:
- Adds the ability to skip source verification for ROS topics. This is required by some hardware encoders, incl. some VA-API ones, that do not handle the switch between the fall-back message ("Waiting for ROS topic..") and the actual stream correctly.
-
v0.23.3:
- Small performance improvement for ROS topics.
v0.22.0 (big!)
- Added bandwidth optimization.
- This saves bandwidth when the scene in the video is mostly static by using variable bitrate encoding. When using the "high" setting for this, it can reduce bandwidth to as low as 5KB/s.
- Reduced latency to around 100ms.
- Increased robustness:
- Better error handling and reporting when sessions fail.
- Eliminated more cases where a request could get "stuck", blocking future sessions using the same parameters.
- Reduced delay in starting the stream in the face of packet loss when using NVIDIA hardware encoders.
-
v0.22.1:
- add quantizer setting (bandwidth optimization) to config provided in Embed
- correctly set bitrate, peak-bitrate, and/or maxbitrate on NVIDIA jetson devices
-
v0.22.2:
- ease-of-use: update video sources on page load and right away when a session ends, to update busy status of v4l2 devices.
- new feature: auto-bitrate mode. This allows you to leave the bitrate unspecified, letting the capability decide automatically what an appropriate bitrate is given the video sources you selected. This, together with the new bandwidth optimization feature, makes it extremely easy to get good quality streams without any tuning.
-
v0.22.3:
- Ease-of-use: Automatically recover from busy USB cameras and timeouts receiving ROS messages
- Namespace ROS 2 nodes in
/transitive
-
v0.22.4:
- Fixes a race condition with ROS topics on NVIDIA hardware encoders (VIC only, dGPU was not affected).
-
v0.22.5:
- Fixes a bug when doing local recording of ROS topic sources
- Sets the default MTU to 1,200, adds new parameter
rtpMtuto overwrite this
-
v0.22.6:
- Fixes a bug when using
rostopic-h264sources, i.e., ROS topics that contain pre-encoded h264 streams
- Fixes a bug when using
v0.21.0
- Improves CPU efficiency of h264 encoding by 3x when using software encoder
- Adds ability to customize test-image resolution and framerate
v0.20.0
- Support for ROS topics carrying pre-encoded h264 streams
-
v0.20.1:
- Avoids high memory usage when establishing the connection takes long (e.g., due to packet loss) when using ROS topics
v0.19.0
- Supervisor UI, embedding:
- auto-join last active session
- only subscribe to subset of session streams
- Made ready for upgrade to Node 20
v0.18.0
- Replace video-streams with an error message if they fail to start within a timeout (currently 2 seconds). This is particularly useful when you stream multiple cameras but one fails to start, e.g., due to USB issues.
v0.17.0
- Improved congestion control: accounting for static network delay
- New debug option: disable congestion control
- Increased default bitrate to 100KB/s
v0.16.0
- New feature: support for streaming audio as well
- New feature: supervisor UI
-
v0.16.4:
- Fixes a problem with h264 streams via v4l2loopback
-
v0.16.8:
- Fixes reactivity, e.g., when switching devices (in JWT) or input sources
-
v0.16.10:
- Fixes an issue regarding the installation of ROS 2 bindings
-
v0.16.11:
- Time out if ROS topic is not published, but still show other streams
v0.15.0
- New feature: ability to record locally to disk on robot/device
- New feature: ability to specify custom source and sink pipelines
- New feature: support for Bayer encoded ROS image topics
-
v0.15.1:
- Automatically recover from interruptions during updates
v0.14
- New feature: hardware acceleration on Rockchip based boards
- Fixed a bug preventing the connection to establish from mobile browsers
- Fixed a bug preventing the embedding of video streams using ROS 2 topics as video source
Details